Sunday 14 February 2016

Clarity Challenge 36 Mid-month Reminder

Clarity Challenge 36
Mid-month Reminder

Love

One Love, One Heart.
(Bob Marley)
        
Hi and thank you for visiting! I appreciate the time you take to 'blog in' and also any comments or questions you may have.
Last month's response was so good, it would be great to equal or even surpass the number of entries submitted. This is the ideal 'Love' month with Valentine's Day and I'm sure you can create some fantastic projects using Clarity stamps, stencils and Groovis'. As far as the latter goes, it's most enjoyable dove-tailing different plates and borders together to produce things which are slightly different.

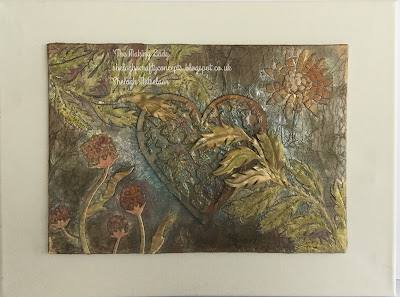
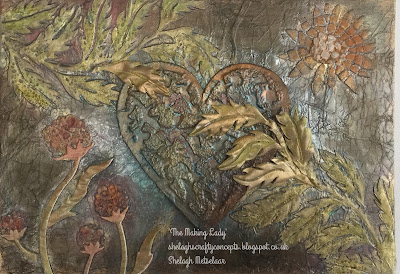
For the mid-month example, I'm afraid there are only photos of the finished product as this project just 'grew' as stencils, papers, pastes and colours were added. 


Materials used:-
·         Clarity Canvas
·         Clarity Stencils:- Leafy Strip, Wild Grasses 1, Sunflower, Vine Heart
·         Papers:-Music Score, Tissue Paper, Parchment Paper, 
       Fresco Finish Acrylic Paints
·         Multi Medium:- Matte
·         Texture Paste
·         Perfect Pearls – variety from both sets.
·         Coloured Pencils:– Polychromos
·         Gilding Wax:- Silver, Antique Gold, Empire Gold, Renaissance Gold

Instructions:-
Canvas
1.       Tear up the music score and apply to cover canvas using the matt medium. Paste over this with matte medium. (N.B. I used the straight edges of the score to line up with the edges of the canvas, ensuring the pieces were horizontal and vertical time about.)
2.       Choose a selection of toning Fresco acrylics and paint in areas until the desired colour is achieved. (I watered them down slightly and gradually built up the colour.)
               

3.       Scrunch up a sheet of white tissue paper, then apply over the canvas which again has a layer of matte medium. Carefully smooth this over the edges, particularly the corners, before trimming the excess then apply a light coat of matte medium to the reverse.
4.       Place on the Sunflower stencil and pull through a layer of texture paste – the large flower head only. Allow to dry.  (I had a bit of an issue here as my new brand tub of grunge paste was too hard to use, so it was a case of rooting around and luckily I found a box of trial texture pastes in my stash.)
5.       Clean stencils immediately.
6.       Place the Leafy Strip stencil on one corner and repeat as in 3). Allow to dry then apply more paste to the diagonally opposite corner and allow this to dry.
7.       Place the Wild Grasses 1 stencil in the remaining corner, pull through more texture paste and allow to dry. (At this point, I applied some texture paste through the clean stencils onto sheets of parchment paper – I used an A5 size for each stencil and allowed them to dry.)
8.       Paint chosen Fresco paints onto the dry paste images and work in with a damp paintbrush. (I watered them down slightly.)

9.       Spray the canvas with a variety of Perfect Pearls – I used Turquoise, Berry, Plum, Red, Gold, Perfect Pearl, Biscotti, Blue Smoke – mixed a few until I achieved the depth and tint I wanted in spritzer bottles. Allow to dry.
10.   Highlight areas with gilding wax. Add gilding wax around the perimeter, blending it in with the colour scheme.


Heart
1.       Place the Vine Heart on a piece of grey board – mine was from the back of a spiral notebook which had been painted and coated with a crackle paint for another project - and pull through coarse texture paste, allowing time to dry. (I had to use the coarse paste as the trial pot was empty!)
2.       Cut out heart, leaving a surround. Paint chosen colours over the paste and allow to dry.
3.       Paint over matt medium and apply tissue paper as above in 3).
4.       Add gilding wax and Perfect Pearls as in 9) and 10).

To complete:-
1.       Adhere heart to canvas. (I used Cosmic Shimmer glue.)
2.       Colour the paste images on the parchment to suit and cut out. (I used the centre from the sunflower, some leaves and stalks up to the calyxes from the wild grasses) Add the over the stencilled images to give dimension, using glue as in 1).
3.       Add hints of gilding wax here and there and shade around the images with pencil – I used a soft black pencil – a 2B.

Many thanks for popping in and looking. Any questions or queries are appreciated and I will do my best to help out. This canvas was not that perceived in my mind's eye when I first embarked on this project and turned out less structured than usual. Despite that, I rather like it!
The Clarity 'Love' Challenge runs until 29th February - as it is a 'leap year,' you have an extra day to join in and remember - there is a £50 Clarity voucher for the randomly selected winner - bit of a no-brainer really.
Best wishes, 
SShelagh (The Making Lady.)


Monday 1 February 2016

Clarity Challenge February 2016
'Love'
'Heart to Heart!'
or 
'Hart to Hart!'
Hello, thank you for visiting and welcome back to Shelagh-land after what seems to have been a very long month. I seem to have achieved a fair bit since the beginning of the year- not least tidying all my Clarity stamps and stencils and clearing out some of my teaching resources to make room for them. 

The theme this month is 'Love' and my first step was to assemble all the Clarity stamps I deemed appropriate. However, I had been looking forward to using this stencil but it arrived just a little too late for my Christmas cards and next Christmas is a little to far off as yet so I came up with this idea but first had to check it would work as you'll see below. The only other issue was finding hearts that were small enough to fit in and they came courtesy of the shamrock from the 'Lucky' set and the 'Love is in the Air' set. So here we go!

Materials:-
·         Clarity canvas:- one 8 x 8ins, one 12 x 12ins
·         Clarity Stencil:- Deer
·         Clarity Stamp:- ‘Love is in the Air’ set; ‘Reindeer and Let Heaven’ set; ‘Lucky’ unmounted set; Birdsong set.
·         Colorbursts:- Pthalo Green, Ultramarine Blue
·         Inkpads:- Distress - Stormy Sky, Weathered Wood, Peeled Paint, Forest Moss, Mowed Lawn,  Old Paper, Antique Linen, Gathered Twigs. Memento – Nautical Blue, Pearlescent Thyme. Adirondack – Red Pepper.
·         Grunge Paste
·         Pens:- Sakura White, Micron Black

Instructions:-

1.       First of all I experimented with the Deer stencil on paper with Candied Apple Distress ink (Only chose this colour as it was in the kitchen and I wanted to check the colour vibrancy.)

I stencilled the deer, complete with antlers facing one way then washed the stencil, masked off the antlers and stencilled through again on the flip side. The idea worked so now I could proceed!

2.       Spritz the 8 x 8ins canvas lightly with water; apply blue Colorburst to the top third and Pthalo Green to the remainder. Spritz again to disperse the colour pigment. Allow to dry.


3.       Place the deer stencil in the centre of the coloured canvas and apply Grunge Paste. Allow to dry. (Wash and dry stencil.)

4.       Flip the stencil to have the deer facing the other direction, mask off the antlers as described in 1) to create a ‘Doe’ and apply Grunge Paste again. Allow to dry while rinsing off the stencil.
5.       Replace the clean stencil over the Doe and with make-up sponges, lightly colour with Old Paper, Antique Linen and a smidgeon of Gathered Twigs.
6.       Remove the masking tape and repeat with Gathered Twigs only for the Stag. Add shade using pencils like Polychromos or Spectrum Noir.


7.       Tear a hill mask from scrap paper and create a hilly background using Weathered Wood, Stormy Sky, Peeled Paint and Forest Moss. Add definition using some colouring pencils as in (6).
8.       Stamp a couple of the ‘Love is in the Air’ images onto scrap card using Red Pepper, concentrating on the heart balloons; add clear detail embossing powder and heat to set. Cut out the heart shapes and set aside. Repeat this process with the Shamrock from the ‘Lucky’ set and cut out the leaves individually.
9.       Place the hearts in the gaps between the antlers to suit and glue to the canvas.
N.B. I put some white glue on the back of my hand, spread it out thinly then dabbed the hearts over. This gives just enough glue to stick down the card hearts.

10.   With a black Micron pen, add faux string to suggest the hearts are suspended from the various antler points. (I added a few ‘Quickie Pen’ glue spots and dusted over some fine colourless glitter.)
11.   Using the pearlescent green inkpad, stamp a random border at the foot of the canvas with the heart grass from the ‘Love is in the Air’ set. Add highlights to the hearts with a white gel pen.
12.   Stamp the antlers from the Reindeer stamp and second generation Nautical Blue ink up the right hand side of the canvas.
13.   Repeat this with the twig from the ‘Birdsong’ set up the left hand side of the canvas.
To finish, I added some pencil shadow under the deer images and the hearts then deepened the yellow spot in the sky before mounting it onto the 12 x 12ins canvas. (I used a sheet of Clarity double sided sticky.)


Et voila! Heart to Heart (or 'Hart to Hart') is complete! 

'Love' is the theme and I'd love to see what you can design and make over the coming month as I know how artistic, creative and inventive you are. 

To enter the Clarity Challenge all you are required to do is to create an original project using Clarity stamps, stencils or Groovi plates, take a photograph and either post it on your blog or send it along with your name to Claritystampchallenge@hotmail.com and it will be posted on your behalf.

The Clarity web-site can be found at www.claritystamp.co.uk and Clarity also has a Facebook page - https//:www.facebook.com/claritystamp.co.uk
     
     Meantime - KEEP CALM AND KEEP CRAFTING  XX  ;~}

Thank you again for popping in. Have a great month!

Best wishes,

Shelagh (The Making Lady)